Debra Prinzing

Get the Email Newsletter!

Clever candles for outdoors (and inside, too!)

Sunday, October 10th, 2010

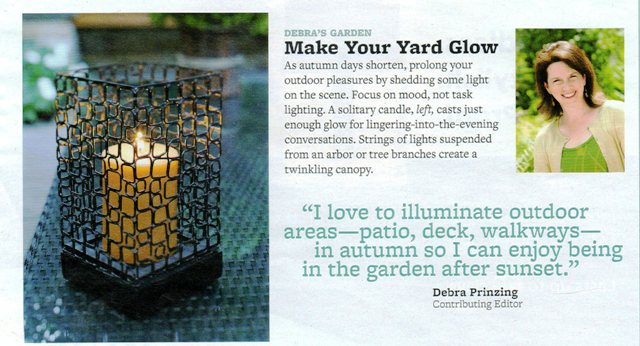
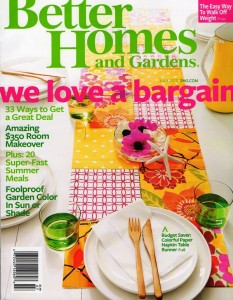
October is well underway, and here is my little “Know-How” piece from the October 2010 issue of Better Homes & Gardens.

It was inspired, in part, by my past visits to my friend Kathy’s garden. She uses outdoor candles incredibly well.

I have always loved the look of luminarias, the traditional candle-lit lanterns that illuminate walkways and paths for Southwest-style holiday celebrations. Modern re-interpretations use paper bags or Mason jars weighted down with a layer of sand in the base holding votive candles inside.

For a fresh twist that takes the luminaria idea and improves upon it, look for 7-Day Candles, also called altar candles. I first saw the brilliant display of these Mexican chapel candles in Kathy’s Southern California garden. Of course, it’s easy to dine and entertain out-of-doors here all year long. But even if you reside in cooler parts of the country, you can still borrow her idea!

White, red, blue or green wax is poured into an 8-inch-tall cylindrical glass container. “You can burn them 15 hours a day for a week,” Kathy says. “Imagine, 110 hours of candlelight for about one dollar!”

You can often find them at Mexican grocery stores or 99-cent/Dollar Stores. I found several styles on the shelf of my local Safeway grocery store – in the Mexican food aisle. And yes, they cost 99-cents!
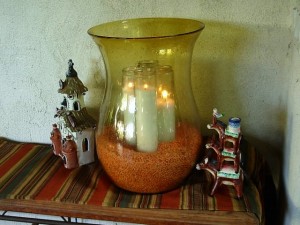
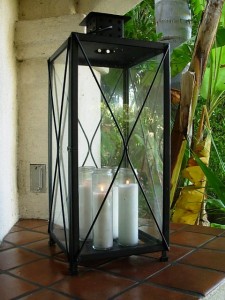
A cluster of 7-Day candles looks brilliant inside a traditional hurricaine lantern.

Here are some of the tall, slender, long-burning candles nestled in a base of dried lentil beans. Perfect for autumn decor!

Kathy began decorating with these clean-and-simple altar candles after too many dinner parties where one-inch votives burned out before the evening was over. She lined her outdoor fireplace mantle with a row of the 7-Day candles, which glowed and sparkled during her al fresco dinners.

Kathy also groups three or four candles inside a large, glass vase for impact. A few inches of dry black beans or orange lentils in the base serve as a stabilizer. Try a variation of your own and you’ll enjoy hours of romantic flickering candlelight.

As for displaying 7-Day candles outdoors, such as on a porch, patio or front walkway, don’t worry that they’ll blow out.

Kathy calls the glass cylinders “little hurricane lamps.”
Here are some additional “illuminating” ideas for your after-dark garden enjoyment:

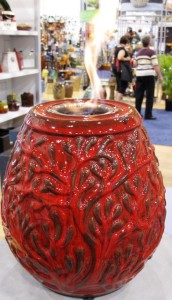
  • Burn a flame:  also adds warmth after dusk. At the Independent Garden Center Show in August, I was amazed at the number of vendors who are introducing these ceramic bowls, lanterns or pots that contain a small metal insert that burns a “gel fuel.” In one catalog, from Napa Home & Garden (see lantern here), the liquid fuel is described as being manufactured from recycled, post-consumer waste – a recycled and sustainable product. The decorative ceramic container burns a long-lasting flame. In the garden, you can illuminate the edges of a pathway or group several lanterns together on a tabletop for after-dark enjoyment.
  • String up lights: Create a twinkling overhead canopy with strings of carnival lighting, holiday strands or small lantern lights. When suspended from an arbor or tree branches, the tiny lights lend a flickering, romantic accent – and just enough light for sitting outdoors with a hot drink.

ILLUMINATION UPDATE: My friend Kathy Purdy, at Cold Climate Gardening, just suggested that I check out solar fireflies: “Personally, I can’t see using these if you have the real McCoy, but I’ve learned that not all areas of the country do,” she writes. Kathy, you’re right. West coast gardeners are not as fortunate as you East coast gardeners. I haven’t seen a real firefly since July 2000, when my family visited friends in Washington, D.C. and we lay on our backs (on their front lawn) late at night – watching the magic!

Fancy foliage in a vase – lessons from Better Homes & Gardens

Friday, June 25th, 2010

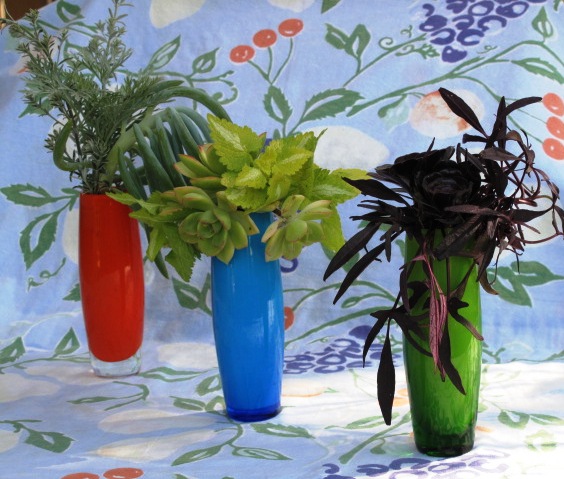
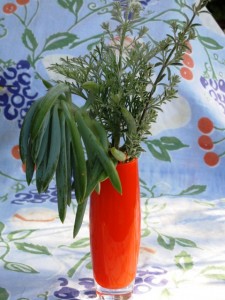
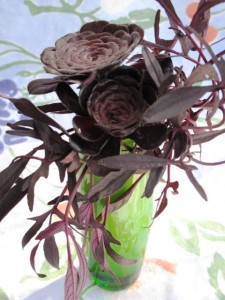
Here is my trio of vases inspired by my "Leaf it up" story in the June issue of Better Homes & Gardens. Each tiny arrangement features at least one cut succulent paired with foliage from a similarly-colored perennial.

Sometimes all you need are a few pretty leaves to conjure up a gorgeous tabletop arrangement or centerpiece. I have my talented friend Susan Appleget-Hurst, former senior associate garden editor for Better Homes & Gardens, to thank for producing a story that illustrates this idea (with several cool designs).

Susan, who now blogs at Cake in the Garden (check it out!) designed the lovely, leafy bouquets and co-produced the story with art director Scott Johnson. Then I was lucky enough to be asked to create the accompanying text. Pick up this month’s BH&G or click here for a peek at the story.

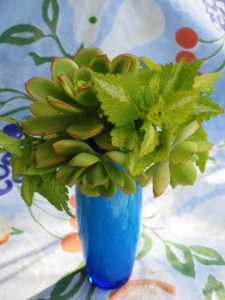
A turquoise vase gets the cool touch from lemon-lime and chartreuse ingredients.

The idea of using leaves as cut flower ingredients is nothing new. But it’s always nice to see someone else’s twist on the technique. One of the things I love about Susan’s designs is her use of white vases in several different sizes. The white really offsets the leaves and focuses the viewer’s interest on the form, texture and scale of the various cut foliage. I also loved the monochromatic and contrasting combinations of leaves.

After writing the text, I kind of forgot about this story until I opened up the June issue and saw how beautifully it turned out. I decided to try my own version of this floral design project (I can’t get more “seasonal, local and sustainable” than my own backyard!).

Looking around my landscape, I realized how many awesome succulent plants grow here. Even when a sedum, aeonium or crassula stem breaks off of the plant or gets bumped when someone pushes a chair out from the patio table, I try to “rescue” the severed piece and put it in water. Inevitably, a few roots will emerge and I can plant that cutting. So clipping a few succulent pieces for the designs you see above didn’t kill me. Once these pieces root, in water, they will be returned to the potting soil or garden bed.

My idea: To showcase the amazing color diversity of succulents. For each of three color schemes – silver-blue, maroon, and lime green – I looked for perennial foliage to match with the companion succulent. Unlike Susan’s white vases, I tried to pair the foliage hues with my slender colored-glass bud vases. I have owned this trio in green, tangerine and turquoise glass for several years. I think they came from IKEA.

These designs look sweet displayed on my block-printed cotton table cloth (it’s nice that each picks up on the botanical pattern and palette).

Here is what I included in each:

Orange vase with silver-blue ingredients.

Deep purple-maroon ingredients look dramatic against the vibrant green vase.

The Orange Glass contrasts beautifully with three silvery-blue ingredients. The succulent element is called Senecio mandraliscae. Here in Southern California, people grow this shrubby, South African succulent as a groundcover. I actually have some in a pot and I love its slightly curved blue-gray leaves. Softer textures come from my other fave silvery garden plants. First is Artemisia ‘Powis Castle’, which has lacy foliage. I clipped the taller stems from Westringia fruticosa, also called coast rosemary. It’s from Australia, has a rosemary-like texture, and looks just gorgeous growing at the base of my fruitless olive tree.  

The Green Glass is a perfect foil for the deep purple-maroon ingredients. My succulent starting point was to add two small Aeonium rosettes. Not sure of the cultivar because I inherited this plant when we moved here in 2006.  Almost like a touch of embroidery, the dark plum version of sweet potato vine (Ipomoea batatas) spills from the neck of the slender vase.

The Turquoise Glass gets a fresh accent from lime green and chartreuse stems. I started with an un-named lemon-lime sempervivum that has pretty pointed leaves. These bold forms have a fluffy collar of chartreuse dead nettle (Lamium galeobdolon).

My challenge to you is to walk outside, clippers in hand, and create a foliage bouquet with what you have growing in your garden. Don’t overlook the unexpected ingredients. Hey – maybe that awesome artichoke leaf in the vegetable patch is worthy of a starring role in a vase. Or perhaps the conifers could stand in for my succulent ingredients. Have some fun! The best part? It means you have a lovely centerpiece for free!

Circles, spheres, orbs, and globes in my garden

Monday, June 14th, 2010

In the July 2010 issue of Better Homes & Gardens, I wrote a short item for my “Debra’s Garden” column called “Curves Ahead.” It could also have been titled “Three Cheers for the Circle.”

I am obsessed with round shapes — balls, spheres and orbs — and I love to dot the garden with these forms. This design trick relates to one of those basic lessons anyone who studies the art of landscape design is taught: Choose an idea and repeat it frequently.

My eye is naturally drawn to orbs and globes. They are so pleasing to me – in fact, I wrote about this passion previously – in an earlier blog post, “Zen of the Circle.”

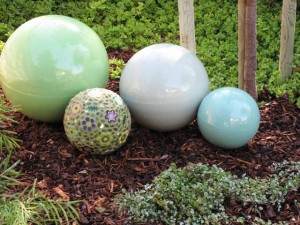
Ornamental globes, obelisks and balls have taken up residence here in my Southern California backyard — check out the photograph below.

And it’s not just the three-dimensional geometry that puts a smile on my face. Curved outlines, such as the edge of a perennial border, patch of lawn or a turn in the path echo the orbs and reappear as arcs or crescents in the garden.

My interest in the sexy, organic globe shape has come “full circle” (pun intended) from a single idea to a cohesive design theme and a nice way to use ornamentation. Look around your own garden. Wherever you see a bare spot, perhaps it’s calling out for an orb or two.

I included a post-script note in my BH&G piece, promising to share my gallery of rounded and curved design ideas with our readers. Here it is – enjoy! Please send me your own photos and I’ll include the best ideas here, too. Check the bottom of this post for some of my favorite shopping resources.

My cluster of orbs in a dreamy palette of green, blue, and teal - with a wonderful mosaic orb by Vashon Island, Wash., artist Clare Dohna

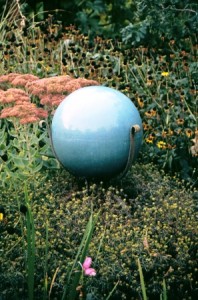
A stunning, cool blue ceramic globe in a Yakima, Wash., garden. You can tell it is mounted on a pedestal to elevate it above the foliage.

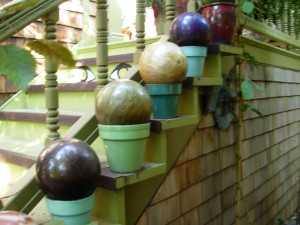
Yes, these awesome orbs are actually vintage bowling balls. Each one rests on a painted flowerpot and is stair-stepped outside the porch of Berkeley, Calif., artist Marcia Donohue.

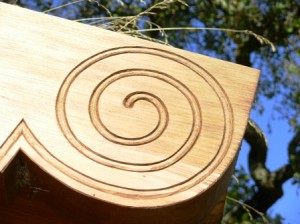
A finely-carved spiral woodworking detail appears at the end of a beam that forms the roof of a dining pavilion in our book, Stylish Sheds and Elegant Hideaways.

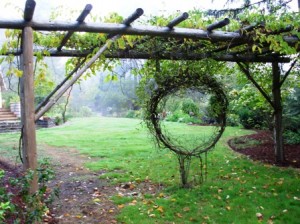
The open circle - a "moon window" or "dreamcatcher" - provides a beautiful perspective in my friend Mary-Kate Mackey's Eugene, Ore., garden. It is mounted beneath an arbor where a hard kiwi grows.

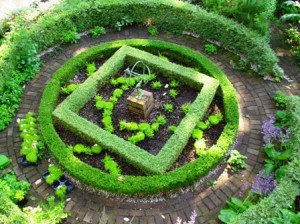
My friend Kathy Fries designed a square-in-a-circle knot garden in her Seattle area landscape.

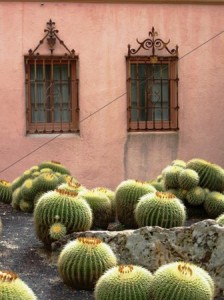
Plants like these golden barrel cactuses are naturally orb-like. You can see these at Lotusland, an estate garden in the Santa Barbara area.

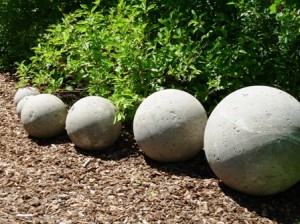
This graduated set of concrete orbs just knocked me out when I first saw it in Sun Valley, Idaho a few summer's back. Thanks to my friend Mary Ann Newcomer, I got to visit some pretty amazing landscapes there.

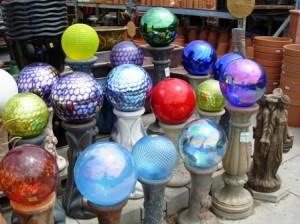
A visit to any well-stocked garden center is likely to showcase the myriad choices of balls. I spotted a rainbow of gazing balls at Green Thumb Nursery in Ventura, Calif.

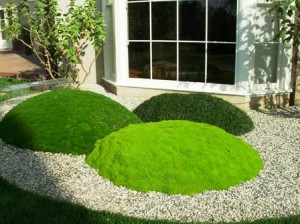
Restful, zen-like. Three types of moss are sculpted into a gravel garden display designed by Southern California landscape architect Graham Stanley.

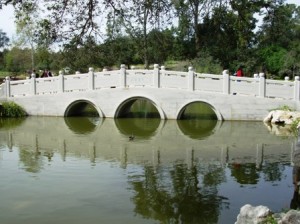
Look for circular forms in public gardens - you'll find them. The arches of a lovely stone bridge are reflected in this pond to create an almost perfect circle. This bridge is at the classical Chinese Garden, recently opened at the Huntington Library, Art Collection and Botanical Garden in San Marino, Calif.

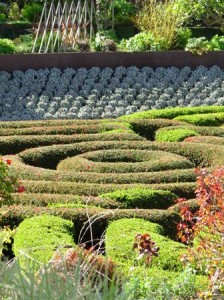
Artist Robert Irwin sculpted flowering azalea shrubs into a circular maze at the Getty Center in Los Angeles. The clipped, concentric circles bloom in white, pink and magenta flowers.

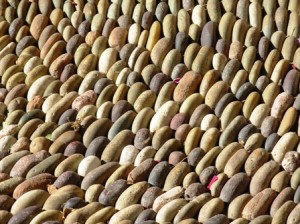
The pebbles in a path detail, arranged on edge and curved into an eye-pleasing pattern.

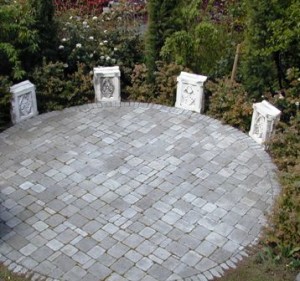
A round "carpet" laid with sand-set concrete cobble-style pavers. Designed for my Seattle friends Rand Babcock and Tony Nahra by Daniel Lowery of Queen Anne Gardens.

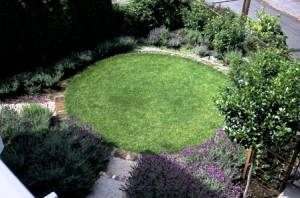
If stone isn't your thing, try turf. This tiny grass "throw-rug" appears in the Seattle backyard of landscape architect Erik Wood and designer Carina Langstraat

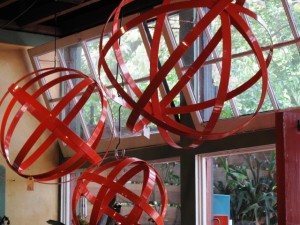
Wow! Metal obelisks - powdercoated in orange (or turquoise), designed by Annette Guttierez and Mary Gray from Potted, in Los Angeles (see ordering details below)

Best resources for spherical garden ornamentation:

Pot-ted Store: Three graduated sizes of balls made from steel strapping will lend a lovely moment of architecture to the landscape. I have the medium-sized one in weathered steel (my preferred material). Annette and Mary, owners of Los Angeles-based Pot-ted, now sell a series finished with bright orange and turquoise powder-coating – their fav hues. Oops – I mean “aqua” and “tangerine.” Inquire about custom colors! Prices: $98 (18-inches); $139 (24-inches); and $169 (30 inches). Shipping available.

Bauer Pottery Garden Orbs: My friend Janek Boniecki has revived the classic California earthenware known as Bauer Pottery. In addition to making reproduction urns, dishes and serving pieces (in that awesome, sun-drenched palette), Janek and crew also create ceramic garden orbs glazed in Bauer colors. Yellow, dove gray, French blue, Federal blue, chartreuse, lime green, midnight blue, parrot green, turquoise, white, black and aqua (for some reason, the Bauer orange pieces are slightly more expensive, perhaps because of the glazing involved).

I am a bit addicted to these “globally admired” orbs, thanks to the company’s occasional factory outlet sales in Los Angeles. I have five or six of these gumball-shaped objects, which look tres-bien in and among foliage, flowers, blades and stems. Prices: $75-$82 (8-inch); $100-$110 (12-inch); and $150-$165 (15-inch). If you think you’ll be in the Los Angeles area sometime, make sure to check the Bauer web site to see the warehouse sale schedule. You will definitely find great prices and maybe even an orb or two (if I don’t get there first!).

Clare Dohna, Mosaic Artist:  Based on Vashon Island, Wash., artist Clare Dohna makes vibrant mosaic tiles in dazzling botanical shapes (flowers, bugs, leaves and more). She uses these tiles to adorn the surfaces of all sorts of wonderful garden sculpture and art, such as bird baths, bird houses, egg shapes and — my favorite – mosaic spheres. You can see one of her pieces at the top of this page; it plays nicely with the solid-colored Bauer orbs. Contact Clare directly (from her web site) to inquire about color schemes and prices.

Plant your summer centerpiece

Wednesday, May 26th, 2010

On location in my own backyard with BH&G senior art director Shelley Caldwell

One perk that comes with my new gig as contributing garden editor for Better Homes & Gardens was recently producing a photo shoot in my garden. Some of the shots from our March session, photographed by the very talented Jack Coyier, appear in the June 2010 issue of BH&G (on newsstands now).   

The story idea came from the Home Design department rather than the Garden Group, but I got involved because this design/entertaining story included plants.    

This is my tale of what happens with a great story idea and how it takes the journey from something pretty HUGE to something fairly modest. I’m learning that it’s all about the creative process, not just the end game.   

It all started when I was asked to come up with three planted container ideas that could look good outdoors all summer long. That sounds easy, doesn’t it? The editor asked:   

As part of a larger summer outdoor entertaining guide, we want to give some ideas for summer-long living centerpieces. Wondered if you would have some thoughts on that and be interested in designing 3 centerpieces. 

I sent her several suggestions featuring foliage plants. Here they are: 

  1. Wood window box planted with edibles: Herbs (chives, flat-leaf Italian parsley, oregano, thyme, and strawberries)
  2. Galvanized zinc or aluminum containers with bold foliage – such as Rex begonias (dark green and burgundy) with creeping jenny or helichrysum (lime foliage that drapes over the edge of the planter)
  3. Terra cotta pots with air plants (silver-blue tillandsias); This is to show a low-maintenance alternative to succulents; tillandsias do not require planting and can be arranged on gravel or pebbles that fill the containers (and misted over the summer to keep alive).
  4. Glazed pottery with grass (or grass-like) plantings; Planted with tufts of green mondo grass or seeded with wheat grass, fill the shallow, Asian-style containers for fresh, summer-long lawn on your table. The grass can be embellished with clear glass votive holders or peppered with cut flowers inserted in the grass with stakes (for single events). This is Jack Coyier’s idea and I think it’s cute!

One of the tabletop designs shot in my backyard - featured in BH&G's June issue

The feedback? Where are the flowers? This is the editor’s reply:   

Something to think about . . . how can we tweak these to be a little more decorative and festive, and a tiny bit less about foliage? Can we get one of them centering on a beautiful bloomer?   

Yikes! I forgot the flowers. Actually, I didn’t really forget them; I just selected foliage plants thinking they would be lower maintenance than flowers (which might require regular dead-heading, fertilizer, etc.) and be guaranteed to look pretty from Memorial Day to Labor Day. Turns out, BH&G readers really LOVE their blooms. There can never be too many flowers, remember?   

I refocused my brainstorming to include more, more, more blooms. The story planning went through several iterations until I was told this might be a feature spread with five different planted centerpieces. I went to town – actually sourcing plants and containers from as far north as Ventura to as far south as Hollywood, logging 200-plus miles on my Volvo’s odometer as I pulled pots, plants and accessories for the March 9th prep day and March 10th photo shoot.   

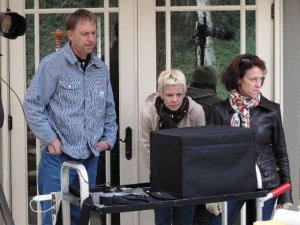
From left: Jack Coyier, Char Hatch Langos and Shelley Caldwell

The plan was to photograph all five tabletop looks. Thank goodness for the very talented Char Hatch Langos, an LA-based stylist who logged even more hours and miles in her car hunting down props than I did!   

She arrived on Tuesday with BH&G senior art director Shelley Caldwell. Between the two of them they had a condo’s worth of patio furniture, textiles, vases, dishes, flatware, napkin rings – you name it – crammed into two cars! All of this for five different looks!   

The looks related to five themes that we had worked out: Romantic; Asian; Edible/Herbs; Citrus Mix-n-Match; and Tabletop Tray of Collectibles.   

So it was a fun two days, with a lot of fine-tuning, adjusting for the sunlight bouncing off of my California Gold crushed gravel garden, unseasonably low temperatures and brisk winds.   

READ MORE…

Better Homes & Gardens and me

Thursday, December 17th, 2009
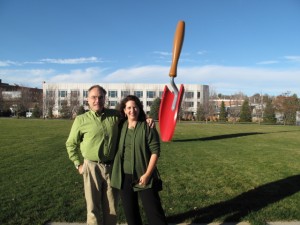
Don't you love this giant red trowel, called "Plantois"?

Don't you love this giant red trowel, called "Plantois"?

On Nov. 30th, I took one of the only direct flights from LAX to Des Moines, Iowa (on Allegiant Air), arriving in the Midwest around 8 p.m.

Susan picked me up at the airport and whisked me off to her cozy home where we sipped wine and reminisced about being in Tuscany together only four weeks earlier.

We indulged in sentimental memories, of course. The week in Italy – in a village called Montisi – was life-affirming, especially because it was to celebrate my big Five-Oh.

Susan on a sunny Tuscan afternoon at La Foce

Susan on a sunny Tuscan afternoon at La Foce


The 10 women who joined me, including Susan, are some of my dearest friends. I would do anything to recapture that week we had together. We’d all love to return as quickly as possible!

The Italy week was an amazing “new beginning” for Susan as she dreamed about her next venture, a culinary destination she plans to open in rural Iowa. Stay tuned for news on “Applehurst Farm,” the project Susan is developing as I write this.

Doug Jimerson and Eric Liskey, BH&G's garden guys

Doug Jimerson and Eric Liskey, BH&G's garden guys

On Tuesday morning, Susan dropped me off at the world headquarters for Meredith Corporation, publisher of Better Homes & Gardens and a million other home, garden, food and lifestyle titles.

I was to spend the day as guest of Doug Jimerson, group editor of all Meredith’s “outdoor” content (books, mags, online) and Eric Liskey, deputy garden editor of Better Homes & Gardens magazine.

It was hard to be businesslike when I kept running into the friends I’ve made and worked with over the years:

They included James Baggett, editor of Country Gardens; Nick Crow, art director of Country Gardens; Jane Austin McKeon, editor of Nature’s Garden magazine and her art director Jarrett Einck; Denny Schrock, a talented editor and past fellow Garden Writers Association board member; Justin Hancock, BHGBH&G web garden editor;  and David Speer, editorial manager. Hugs and high-fives ensued. These are people I would rather be friends with than spend my time hustling for assignments.
Doug and Eric and I brainstormed about possible ways I can get more involved in BH&G’s editorial pages. Then we met up with Gayle Goodson Butler, editor-in-chief of the mothership!

Wow – what a great experience. Gayle, Doug, Eric and I had a delicious lunch during which we tossed around story ideas and discussed outdoor living trends. It looks like I will join the BH&G family as a contributing editor for gardening and outdoor content in 2010. I couldn’t be more excited!!!

I'm posing with BH&G garden editor Eric Liskey

I'm posing with BH&G garden editor Eric Liskey


I also posed with Doug Jimerson, Meredith's Group Editor for Garden & Outdoor Living

I also posed with Doug Jimerson, Meredith's Group Editor for Garden & Outdoor Living


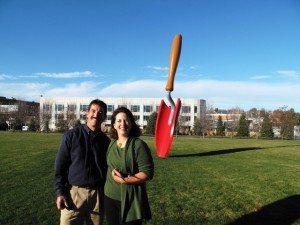
After lunch, we took a tour of the Meredith “campus,” which includes an incredible, larger-than-life sculpture of a trowel called “PLANTOIS.” The pop-art style of this sculpture reminded me of the 19-foot eraser at the Olympic Sculpture Park in Seattle, called “Typewriter Eraser, Scale X.”  Turns out, BH&G’s trowel was also designed by Claes Oldenborg .

A site plan of BH&G's gorgeous test garden

A site plan of BH&G's gorgeous test garden

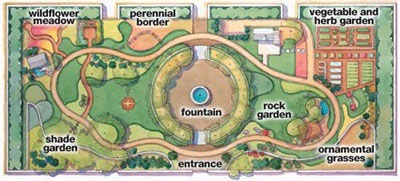
Doug and Eric also showed me Better Homes & Gardens’  Test Garden, a beautiful walled oasis in the heart of the corporate campus. Here’s a plan of the garden (right) and a company description of how it is used:

It is an outdoor studio for our photographers, a venue for corporate entertaining, and a meeting and lunch spot for employees. While inner-city, the garden is landscaped in the style of someone’s backyard. Or, actually, several someones’ backyard. Because anywhere you take a look in our garden, if you turn ever so slightly, you will have a whole new vista. Because anywhere you take a look in our garden, if you turn ever so slightly, you will have a whole new vista. And so will our cameras, as we set about photographing how-to sequences and plant portraits, and documenting the performance of new plants. In all, there are 22 distinct areas in the Test Garden.

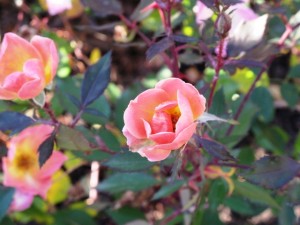
Yes, a rose was still in bloom on Dec. 1st

Yes, a rose was still in bloom on Dec. 1st

Mind you, this was on Dec. 1st in Des Moines, USDA Zone 5 or something like that. But several roses were still in bloom and the garden looked almost ready for its dormant winter phase, with lots of fresh mulch spread around, grasses and perennials cut back and everything tidy.

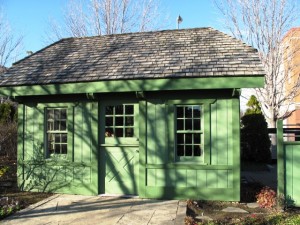
I was particularly drawn to the green shed, of course. I found out from David Speer that the plans for this potting shed are a free benefit of joining BH&G’s new Garden Club.

I do love this green potting shed with gabled roofline

I do love this green potting shed with gabled roofline


For $9.95, you get the shed plans and other cool resources. Check out how to sign up here.  

If you find yourself in Des Moines, you can schedule a tour with garden manager Sandra Gerdes on Fridays from noon to 2 p.m., May through October. The garden is located at 1716 Locust Street, Des Moines, IA 50312. The phone number is 515-284-3994.

Here are more pics of the beautiful Test Garden:

By the way, the original test garden is on Doug Jimerson’s farm outside Des Moines. I got to visit that evening and join him and Karen Weir Jimerson, his writer-wife, for a delicious dinner.

Okay, doesn’t it make you feel better to know that the guy who heads up all of Meredith’s garden/outdoor living content is basically a gentleman farmer? In addition to their lovely farm and century-old farmhouse, Doug and Karen tend to six dogs, at least six cats (I lost count), a flock of sheep, a huge family of chickens and roosters, donkeys and horses. Before dinner, Doug gave me a tour of the Jimerson Farm in the waning daylight. I thought about how much I could love living on a farm in Iowa. Never mind. I’m just going to visit Susan and Jerry when Applehurst Farm gets up and running.

As for BH&G, my first contributions won’t appear until May 2010, but you can be assured that lots of creative storytelling will occur between now and then.

I’m excited – and grateful – for this cool opportunity!

Let’s see what 2010 brings!!!

A Post Script. I flew home from Des Moines on Dec. 2nd. While I was there, the weather was beautiful, with brilliant blue skies, sunshine and balmy (for Iowa) low 50-degree temperatures. One week later. . . yes, only one week later, my friends were buried in 16 inches of snowfall that practically shut down Des Moines. I heard that something like only 17 out of 60 flights were allowed to depart from the Des Moines Airport.

Whew. I totally lucked out. Thank you to the weather gods!

December has arrived!

Monday, December 1st, 2008

It was 74 degrees and sunny here today in Southern California, but I have wintry visions dancing in my head.

To get into the holiday spirit (even though the leftover turkey and stuffing is still packed in the fridge), I picked up the December issue of Better Homes & Gardens magazine, out on newsstands now. That’s where my pal Susan Appleget Hurst serves as the talented senior associate editor for gardens and outdoor living. She blogs as The Everyday Gardener (with colleague Eric Liskey).

When we were last together in September, Susan mentioned that she had worked on a wintry design for iced botanical containers to hold votive candles. (Photo at right: Mary Ann Newcomer aka Idahogardener.com; Susan, and me, taken while gallivanting around Portland in September).

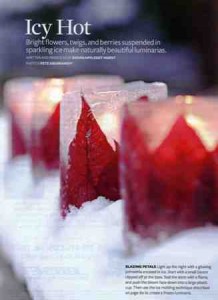
The idea Susan described sounded gorgeous and sparkly, a creative new way to use favorite ingredients from the garden — leaves, berries, colorful branches and conifer sprays — for holiday decorations. Her twist on the traditional luminaria even found a new use for poinsettias, which are rarely successful as cut flowers.

I spoke with Susan today and congratulated her on the alluring designs, which are splashed across five pages of the magazine. She sent me a web link to a BH&G video demonstration, which makes the project easy-to-understand and replicate.

All you need are a few ingredients and space in the freezer to transform a watery concoction into frozen floral luminarias. Susan’s article begins on page 58 of BH&G. It’s titled “Icy Hot: Bright flowers, twigs, and berries suspended in sparkling ice make naturally beautiful luminarias.”

Susan has a culinary and herb-gardening background, so it didn’t come as a surprise to learn that she has used a similar technique to freeze blooms and herbs into ice rings to float in punch bowls. That handy trick, combined with the editorial challenge of showing readers new ideas for using their garden during the depths of winter, added up to the holiday-on-ice project. The frozen floral ring, best employed for a summery brunch, also taught her that distilled (rather than tap) water is preferred because it freezes clear rather than cloudy.

Susan first captured ruby red poinsettia bracts in a flexible plastic container, arranging each leaf so it’s evenly spaced (see finished project, above). Pour in a little bit of water, say 1/2-way to the top. Then insert a smaller plastic cup, sinking it with a few stones. Pop the entire vessel into the freezer until it’s frozen solid. There are tips in Susan’s article for choosing the right containers and for slightly thawing your creation in order to remove the finished product from the plastic molds.

The poinsettia votive holder was so successful that Susan experimented with colorful cut branches, arranged to stick out around the top of a luminaria like a beautiful nest for an exotic winged creature.

“How on earth did you fit that into the freezer?” I asked.

She laughed and pointed out that the water-and-branch-filled mold (actually a big plastic cake carrier) froze in the outdoor environment of her Des Moines, Iowa, backyard.

“I just needed sustained, freezing temperatures,” she added (assuring me that these conditions do not occur every winter in Des Moines, but they did last year when Susan played around with this project).

Um, okay. Well, since we don’t have an open-air freezer here in my SoCal yard, perhaps I’ll stick to Susan’s smaller projects. Like the ones that use 1-litre and 2-litre pop bottles with the tops cut off.

The Icy Hot story illustrates Susan’s gifted floral design skills. She’s got more tricks up her sleeve and you can find them in future editions of Better Homes & Gardens. Here’s what I managed to get out of her: The February 2009 issue will feature Susan’s inspired new way to design with forced branches and fresh flowers. In April 2009, look for her egg story. I don’t want to give away the details, but suffice it to say she is NOT cooking an omelet or quiche with her eggs!

Happy December. I hope it’s filled with joy and peace for everyone.