Bouquet-making with spring bulbs
March 4th, 2011
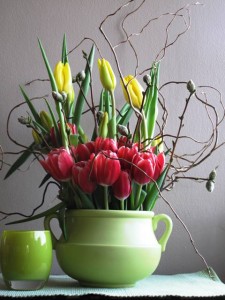
A textural display of two colors of tulips with curly willow and camellia buds on stems fill this vintage green urn.
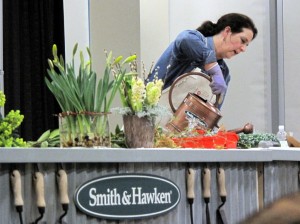
The Northwest Flower & Garden Show, the country’s second-largest indoor flower show, was staged last week. It was a great show and I’m sure I’ll be posting future stories about some of the wonderful design ideas, plants and speakers that inspired me. But right now I want to show off some of my floral design projects with simple instructions. The arrangements are from my talk and demonstration last Thursday on the Smith & Hawken DIY Stage.
Here in Seattle the crocuses and snowdrops are only just now blooming. Daffodil foliage is just a few inches out of the soil. So my talk on “Floral Design with Spring Bulbs” was geared to the flower-lover who seeks out local blooms from growers in his or her own backyard.
One such grower is Alm Hill Gardens, owned by Gretchen and Ben Hoyt. You can find Alm Hill flowering bulbs and other cool crops like lilacs and peonies year-round at the Pike Place Market and at weekly outdoor farmer’s markets including Ballard, University District and West Seattle. I encourage you to always ask questions about where and how the flowers you buy were raised. There is nothing better than meeting the farmer who actually grew your bouquet.
For a few weeks prior to last week’s flower show I had fun playing with tulips, daffodils and narcissuses, and hyacinth flowers to come up with the techniques I wanted to teach.
The detail photos you see here are from those samples, so the tulips (sadly) are not Alm Hill’s, although they are still fresh and locally grown. During my demonstration I was too busy to stop and photograph each project, but perhaps someone who attended will surprise me with their pics, as my friend Lorene Edwards Forkner did yesterday when she showed up with a CD of a few photos from the talk (THANK YOU!).
For each of these projects, my goal was to use an organic method of stabilize the blooms, rather than the conventional green foam blocks called “florist oasis.” That product, I have learned, is a carcinogen that contains formaldehyde (why would you want to touch or breath it?); and furthermore, it does not break down in landfills. I do understand why designers have used it for years. So far, there really isn’t an organic alternative to organizing and arranging flower stems to maintain the perfect form or angle. Yet increasingly, I am meeting and interviewing floral designers who consciously shun the green foam and use alternate materials to stabilize flower stems.
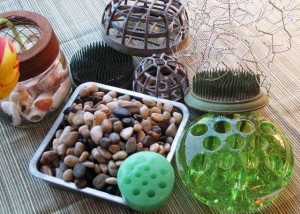
Here's a selection of my flower-stabilizing options, including lots of vintage glass and metal "frogs"
Here are a few options:
- Pebbles, sand, gravel or marbles in the base of a vase
- Pliable twigs wrapped around the inside of a vase to create a basket weave-like framework. One designer who David Perry and I interviewed uses shredded wood shavings called Excelsior inside her vases. This is the type of material used to ship wine bottles, and it’s biodegradable.
- Good, old-fashioned flower frogs in ceramic, glass or metal. I’ve been picking these up for a few bucks at weekend flea-markets. One of my favorite is a half-dome cage. It is heavy so it sinks to the bottom of the vase; and it has 3/4-inch square openings, which is ideal for woody stems. These are the arranging tools of the past, seriously useful for the present!
- Foliage. I often start an arrangement using soft, fluffy foliage as the “base” that peeks out over the top of the rim. For winter/early spring arrangements, Dusty Miller is a nifty option. It is lacy and soft – and it lasts for up to 2 weeks in water once cut. Once you fill the vase with the foliage, all the other flower stems can poke through the foliage and they will remain in place.
- Balled up chicken wire is another time-honored trick for stabilizing especially larger arrangements. It also works well for wide-mouthed vases. Get a roll at the hardware store (my local hardware store told me the proper name for this stuff is “Poultry Cloth” – whatever). You will need use wire cutters to trim off the length you want. Use gloves to protect your hands from wire scratches and create an open “ball.” After inserting into the container, make sure that a portion of the wire emerges above the rim so your design looks fuller.
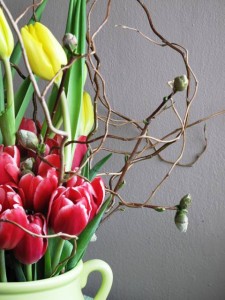
All these fresh spring details play so well together, especially the sprouting willow branches and the camellia buds.
Design One: Tulips (2 colors) with curly willow and camellia buds. I used a 4-1/2-inch diameter x 2-inch high dome-style metal flower frog in a vintage lime-green urn with handles.
- Note that the curly willow is starting to sprout tiny green leaves. That’s what happens when willow stands in H20 for a few weeks inside a warm home.
- As for the camellias, these are branches left over from a photo shoot last month. The dried leaves were crunchy and unattractive, but the buds were plump and interestingly shaped. So I grabbed my floral shears and clipped away the leaves. The chubby buds on the branches are a nice architectural accent.
- I first inserted the willow and the camellia branches, forming an open “nest.”
- Next, I inserted 10 red tulips, cutting their stems short so the flowers are close to the opening of my vase.
- Finally, I added the yellow tulips, cutting the stems longer. You will note that none of the short or tall tulips are the same height. I like to stagger them so there is a less formal feeling to the design. As I inserted the tulips, I used the framework of the branches to also help support their flowerheads, especially the tall ones.
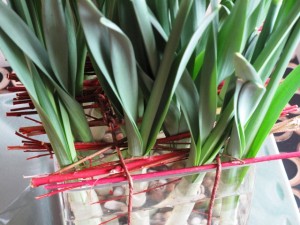
Design Two: Daffodils and red-twig dogwood branches. I used a 6-by-6-by-6 inch glass “cube” vase and filled the bottom 1/4 with medium-sized pebbles.
- The inspiration for this design comes from a Winter 2008 edition of by Design, which is published by The Flower Arranging Study Group of the Garden Club of America. In the article, Cres Motzi demonstrated a way to layer a row of cut branches over the opening of a rectangular container and “strap” them on with twine to create a framework for inserting branches. Her design also used floral foam inside the container, but I find that completely unnecessary here.
-
I cut 9-inch lengths of pinkish dogwood branches, lining them up in parallel rows across the opening of the vase. Available at craft stores like Michael’s, twine-wrapped wire is an ideal material to strap around the bottom of the glass vase and over the twig arrangement. It can be twisted taut and secure. There is a band of twine on either end of the twig arrangement.
- This design is so simple and serene that it called for a singular flower. Fifteen just-picked daffodil stems look great here. I inserted them into openings between twigs and twine, staggering them in an informal arrangement. You can see how well these stems stay upright, aided by the pebbles in the base of the vase.
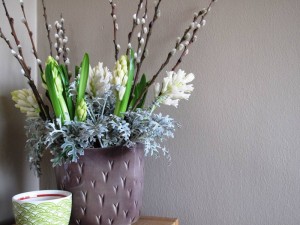
Design Three: Hyacinths, Dusty Miller and pussy willow branches in a vintage oval vase. Here, the Dusty Miller foliage is the stabilizing element for the other stems. The vase is a 6-inch high vintage 1940s piece. The opening is an oval, approximately 7 inches long x 4 inches wide. I love this vase! It came from a visit to Old Goat Farm in Orting, Wash., owned by my friends Greg Graves and Gary Waller. Their nursery and shop is filled with surprises, including some vintage pieces like this.
- Even here in the dead of winter, good old Dusty Miller (Senecio cineraria), a shrubby perennial from the Mediterranean region, is holding its own. Gray and kind of ubiquitous the rest of the year, Dusty comes in handy when one needs a soft foliage ingredient to contrast with darker greens. I robbed this batch (with permission) from my friend Nancy Finnerty’s Madison Park garden two weeks before I used it in the flower show demo. This stuff is pretty ironclad. Cut the stems as long as possible and start filling up the vase with them. The leaves are deeply cut and lobed; when used in a floral arrangement, they take on a lacy profile.
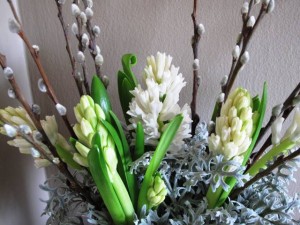
- Insert 5 or 7 long-stemmed hyacinth flowers. Right now, Alm Hill Gardens is selling
creamy white, dark pink and deep purple varieties – and the scent is truly intoxicating! Gretchen explains that she gets the longer-than-normal stems by starting the bulbs in the dark. Those poor babies are reaching for light during their growth phase, so that’s why their stems are much longer than the ones you or I would grow in the ground. Pretty gorgeous stuff. Again, notice that the stem lengths are staggered.
- Finally, insert 7 or 9 pussy willow branches, also at varying heights. These are from a grower in Oregon and I like how they resemble floral exclamation points in this wintry white arrangement. This design is long-lasting. If the hyacinths decline (yet they still look great and this arrangement has been finished for 8 days!), you can always replace them, cuz the pussy willow and Dusty Miller will keep on keepin’ on for at least twice as long.
During my demonstration, I was so pleased that Gretchen Hoyt was in attendance with her assistant, as well as several other seasoned growers and designers – and they offered lots of suggestions and tips. One tip from Lorene’s bag of tricks os how to refresh H20 in a vase with so many complicated parts like the branched framework and the curly willow. Her technique is to first put the vase in the kitchen sink. Using the spray nozzle on the faucet, gently spray fresh water into the vase until the existing H20 starts spilling up and over the edge. If you continue for a minute or so, you will have completely replaced old, dirty water, with new, fresh water. Voila!
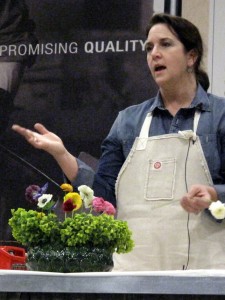
I'm working with locally-grown flowers and garden ingredients at the Northwest Flower & Garden Show.
If you are wondering about some of my other resources you see, here is a list:
- Smith & Hawken copper watering can and other accessories are now available exclusively through Target stores.
- The wonderful canvas work apron I’m wearing (right) was designed by my friend Janna Lufkin, who is a popular home organizing authority and stylist for Better Homes & Gardens and other outlets. Janna’s products are made locally in Seattle and available through her blog Be it Ever so Humble.
-
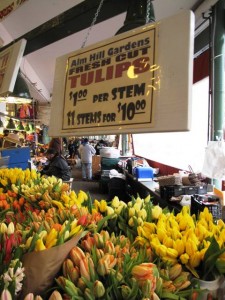
Alm Hill Gardens can also be contacted for tulip deliveries. You can order any number of stems (there is a one-dozen minimum) of your favorite tulip colors and have them shipped via overnight or 2nd-day air.
- To order or for more information, contact Alm Hill at almhillgardens@gmail.com or call toll-free at 855-ALM-HILL (855-256-4455). I took lots of photographs at their Pike Place Market booth last week and thought I’d share some of the yummy shapes and colors of these fresh, local and sustainably grown blooms.
Finally, a special thank you to my partner-in-flowers, David Perry. The projects you see here will be featured in our forthcoming book, A Fresh Bouquet. And I can promise you that the photos he takes will be dazzling beyond belief.
We invite you to follow along with us on this journey at our blog, A Fresh Bouquet.



March 4th, 2011 at 6:32 pm
Lovely and inspirational!
March 4th, 2011 at 9:24 pm
I wish I could have been there! What great ideas! And belated happy birthday . .
March 5th, 2011 at 12:25 am
I have so much blooming…. thank you for the inspiration on how to display.
March 6th, 2011 at 10:09 am
Sorry, to have missed the NWFG show. This is a great post on your talk.
I love, love, love the red twig dogwood lattice. That thin red line really balances the big yellow daffs.
I also love information on the alternative (re-turnatives) to oasis. I read in Flower magazine of designer using
melons (whole) as an organic substitute for floral foam.
March 8th, 2011 at 11:53 pm
Debra, Thank you for sharing your talents. I’m so glad to have new ideas for spring bouquets; very inspiring. By the way, I cannot wait for your upcoming book. When oh When will it hit the bookstores?
March 12th, 2011 at 4:58 pm
Ummm… I can almost smell the hyacinths. They last so long in household temps, too.
May 7th, 2011 at 11:44 am
[…] and garden-appropriate fretwork of colorful dogwood stems and twine wrapped craft wire. Go here to see details of her finely crafted workshop designs. Hmmmm, I didn’t have any dogwood […]